Introduction to Arduino Uno
In our third week lab we studied about Arduino Uno. The Arduino Uno is an open-source microcontroller board based on the Microchip ATmega328P microcontroller (MCU) and developed by Arduino.cc and initially released in 2010. The microcontroller board is equipped with sets of digital and analog input/output (I/O) pins that may be interfaced to various expansion boards (shields) and other circuits.

To run the code or to do test we need some hardware components like
- Arduino Uno
- Breadboards
- Wires
- USB Cable
- Transducers
The Arduino Uno consists of USB port to computer, reset button, clock, microcontroller, inputs and outputs.
The first test was "Blink test" where we have to connect wires to uno and have to run some codes to test whether it becomes successful or not.

How it works
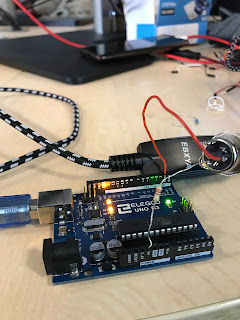
-First we have to connect arduino uno with computer by USB,
-Then connect black, white and red wires in arduino uno and breadboards,
-Connect red wire in A5 in arduino uno and 30e in breadboard,
-Then connect black wire in GND in arduino uno and 26e in breadboard,
-Similarly, connect white wire in A0 in arduino uno and 28e in breadboard,
-Then again, connect the 10K resistor in 26b and 28d in breadboard,
-And connect the photoresistor in 28a and 30b in breadboard.
Code to run the program
/ /the setup function runs once when you press reset or power the board
voidsetup() {
// initialize digital pin LED_BUILTIN as an output.
pinMode(LED_BUILTIN, OUTPUT);
}
// the loop function runs over and over again forever
voidloop() {
digitalWrite(LED_BUILTIN, HIGH);// turn the LED on (HIGH is the voltage level)
delay(1000); // wait for a second
digitalWrite(LED_BUILTIN, LOW); // turn the LED off by making the voltage low
delay(1000); // wait for a second}
Then click upload buttton to upload the code
Result
The built-in LED toggles between on/off periodically every second.
Overall, this was the first time that I used elogoo uno so, it was pretty difficult. The wiring processes were also little difficult. The standard of USB were used with elogoo uno to create a blinking light which responds to the light sensor i.e. higher levels of the light would make it blink faster and lower level of light would make it blink slower.


Comments
Post a Comment